First load - bisque firing

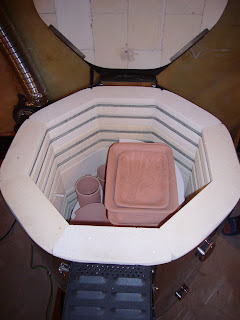
Loading the kiln was my biggest concerns/worries when I was thinking to start my home studio. I had never done it before and I've heard many bad things that can happen if you don't do it right. I guess that's true for everything we do, if we don't do it right, bad thing can happen! Anyway, to prepare myself for loading the kiln for the very first time. I went online to check out the How to. eHow.com is a great website, I've found many pottery videos with excellent information. Of course, thanks to the instructors putting in all the effort producing the videos! I love those videos from Emily (http://www.littleepottery.com/). She explains the steps very well. With her help, I was able to prepare my kiln furniture (put kiln wash on them), learnt how to load my kiln properly etc and here is the result.....First load ever started on July 31 at around 2 pm with preheat set for an hour. It contained 14 pieces with some of them stack. It took just over 9 hours to complete and was unload the next afternoon. I'm very pleased with the result and no longer worry about bisque firing. I guess the next thing I have to worry about is mixing the glaze and of course glaze firing!

Comments

Popular posts from this blog

Pottery girl has been quite productive

Like I mentioned last time, since I didn’t have a show in December and didn’t spend much time outside this winter, I was able to spend more time in the studio. As a result, I actually have some finished pieces ready! I opened the kiln earlier this afternoon for my second glaze firing of the year (can you believe my 2nd glaze firing in April, this has never happened before)—here they are (sorry about the lighting…). The bottom shelf, the initial picture didn't work out and I had to take another one 2nd shelf with pieces that I did slip trail.  This is my first time doing this and I quite like the result. 3rd shelf  Top shelf  I’ve also been trying out a new look for my mug handles, but they didn’t make it into this firing. Hopefully it won’t be too long before the next update!

Another disappointment :(

I was firing up my bowls for Ottawa Guild of Potters' annual event: The Great Bowls of Fire last night.  I made 7 soup bowls, was thinking to use them to try out different glazing techniques with Ron Roy's Black and Mysterious Blue.   When I was potting at the Nepean Visual Art Centre (NVAC), I had this lovely combination of NVAC's black with Mysterious Blue (as seen on the right).   However, I've been having trouble with the NVAC's black recipe, so I went with Ron Roy's Black.  It looks pretty smooth and all.  However, it just doesn't have the same effect as the NVAC's black and mysterious blue.  It's quite disappointing.  Also, I might have made too thick of a layer for the black, it cracked a little too.     notice the chip - this one is with the same technique as shown above) this one is done by pouring in mysterious blue on black Unfortunately, since the chipping is in the inside of the bowl, I can't tak...

Glaze and Chemistry (or should I say glaze chemistry)

Until last weekend, I wouldn't put chemistry and glaze recipe together, because I'd been just following the recipes and didn't think much about the reaction to the glaze between those chemicals.  But Ron Roy (the author of Mastering Cone 6 Glazes) workshop had totally changed my perspective.  It was a very informative session.  Ron showed us how to use INSIGHT and GlazeMaster to analysis glaze recipes and how we can fix it if there is a problem with it.  It was a bit like going back to high school Chemistry class and the chemical symbols....NaO, KO, CaO, Al etc...and my brain almost exploded at the end of the second day. :p I have now purchased INSIGHT and my plan is to put in all the glaze recipes I have now and see how stable they are in cone 6.  That should be fun. Inventory update: I managed to make my 6 pieces before the end of April.  They are mostly plates.  For May, I will be making mugs again. :)